Saturday, June 7, 2014

MacBeth -costuming


 In January, I had the honor of helping to create, and alter existing costumes, for Skinhorse Theater's production of "The Scottish Play". For the week leading up to dress rehearsal, I moved my machine and materials into Tigermen Den in the Bywater, and hung out with these awesome talented people. The fact that the script had been economized to be preformed by only 5 actors was a plus, but then there were 5 people playing 12 seperate characters so the focus moved to changing them convincingly.
      Lee had already found a perfect pattern and material for the three weÄ«rd sisters and I spent a day with him in his studio finishing, fixing, and reinforcing their hooded "body cloaks".
To Organize, I made a wanted poster for each of the characters. Where I had not yet photographed the actors in their costumes, I downloaded funny (sometimes) images of other versions of those characters from thespian history. As I surveyed each persons costume, I would write ideas down of how to add to it or a list of alterations that needed to be performed.

Crowns. Always a crucial wardrobe prop -after all it IS what all the murder is about innit? Thanks to Southern Costume Company in the CBD for letting me dig around for a few hours. Serious contender on the left and as a joke, the other.
 Below are some production stills by Bill Brown. Enjoy


Really had a wonderful time working with these awesome people. Looking forward to sharing some current sewing for theater projects that I am working on. Be sure you visit you some fringe in the fall.


Monday, March 31, 2014

torso form

I had been looking for good, full sized torso forms on which to photograph and map out the mechanical logistics of sewing designs. For a whole year, I kept my eyes open. The problem is that to make them easier to dress, they are often mannequin skinny, and to me not proportioned as a real human form. I sort of always had it in the back of my mind to make my own, but where to begin? What measurements SHOULD sh/he be?
    I began by drawing what I thought would be a good average onto a thin piece of plywood board, and cutting it out with a jig-saw.
 By making it in two halves, I figured I could put a hinge down the center, and that would be a great help in dressing and undressing the form. Once I had the two haves, I cut a clean sofa cushion into 2" wide strips and began mapping out the bodyform.
At this stage, I found it important to do some extra intensive research on the layout of the human landscape. I wanted to be as accurate as I could with where the body rose and fell, slopes and angles that govern how the thighs fit into the trunk etc. Using scissors, I found I could do more sculpting by "shaving" the torso here and there.
With that completed, I went about hot gluing the the individual stacks of cushion together, and adding some breast pieces. I knew that once I covered the whole thing in canvas, a lot of the subtler features would disappear, but as long as I had a working form, I'd be happy.
After putting in a few darts in the neck, armpits and crotch area, I tacked the canvas down with a staple gun around the back of each panel, and joined them using two 18" long 1x2's, and hinges. Lastly, I fitted the bottom of my form with two "footie" pieces of wood to help her/him stand up. Ready to dress! I am sure this piece will become a prominent fixture in blog entries to come, and I am glad to report: ~95% recycled materials. All I ended up having to buy was screws and hinges.


Sunday, March 30, 2014

swimsuit 2

Flattered to be asked to make another swimsuit-like monokini. I have to let newly bought fabric get lost in the studio from time to time, just to distance it from the purchase. Then I miraculously find it again, and it's like it was free! So I happened to have this p/d fabric and thought it would be a sort of betty page update. From the back it looks almost chaste.
As always, it starts with a drawing, which I then transpose onto paper. A lil trick I devised is to use the entire form on one piece of paper, and poking semi big holes into the pattern where the edges overlap. This way, you can have less paper patterns to go missing in the chaos. I can also use the same bra pattern, even for different sizes, and I don't need a separate one.
Using clear plastic tape, I can reinforce the paper where I have poked my holes, so that as I am "stippling" through them with a pen, they don't tear etc. When I have drawn my lines, I cut the fabric and begin pinning pieces together. Obviously, symmetry is the name of the game, in drawing and cutting the pattern, transposing and cutting the fabric, pinning for the seams, and sewing the fabric together. At every stage of the project I have to police the symmetry of everything.
Another thing that ends up being imperative, is the balance of elastic strengths and pulls.


Next comes the sewing of all the side-seams. I make sure to leave enough room in the fold to thread my elastics through. Making the long straps for the back consists of cutting longer strips of fabric, about an inch wide, with a string down the center and stitched into the far end, careful not to let the string get into the seam anywhere along the tube. I like to first do a zig-zag to make sure I didn't accidentally sew-in the string (if so, it's easier to rip than a straight stitch), and then I do my straight stretch stich down the middle of the zig zag.
 Running the string down the center of the tube/strap makes turning it inside out a snap. Getting it started gently with a chopstick is a good idea. Once you have turned the full length of the strap inside out, the string can be cut off with the end.It got away from me before I could photograph the finished product, with straps and clasps and all. There are some plans to do a shoot though. Stay tuned.


UPDATE: Some highlights from our shoot! Enjoy.

Tuesday, January 21, 2014

undies hack

Undies Hack

Oh the state of men's underwear. I have made several pairs for myself, friends and partners over the years, but often I find myself having to buy them. I have larger battles in my life, trust me, and falling through the size-cracks of conglomerate underwear makers is not one of them (I fall right between 30" and 32"). Also, I refuse to advertise for them whenever I bend over. My solution is to cut away the waistline elastic, and take a few hours to customize.


1. Cut the large elastics off the waistline of the underwear. I will be saving these for other projects of course.
2. Next, I pin the new waistline into a tube around the top to accommodate the width of elastic I want to use, and sew it into place using a straight stretch seam, and a zig-zag (I do not have a surger). Remember to leave about a half inch free to "thread" the new elastic through.
3. Cut the elastic to a desired length, and pierce it with a small safety-pin. This will give you something solid to pull through the tube around the waistline.
4. Once you have gone around the waist with the elastic, remove the safety pin, and sew the two ends together with at least a 1/2" overlap. Take a second to make sure that the elastic didn't get a twist in it as you were threading it through. A twist in one's underwear elastic can be very annoying.


5. Once your elastic is sewn into a strong loop, you can pull the waistline taut, and close the remaining hole. Voila! better fitting men's underwear, with no advertising for fruit of the loom. You can stop here, or I like to put some customizing touches on whatever I am making, to give it that one-of-a-kind status. 

For this particular customization, I chose a star shape to put on the backside. First, I used a piece of scrap paper to draw out the star, cut it out and checked the placement. Next I traced it onto a piece of scrap yellow fabric.


then, I traced the shape onto the yellow fabric, and cut it out. Placing the star where I wanted it onto the underwear, I then pinned it.


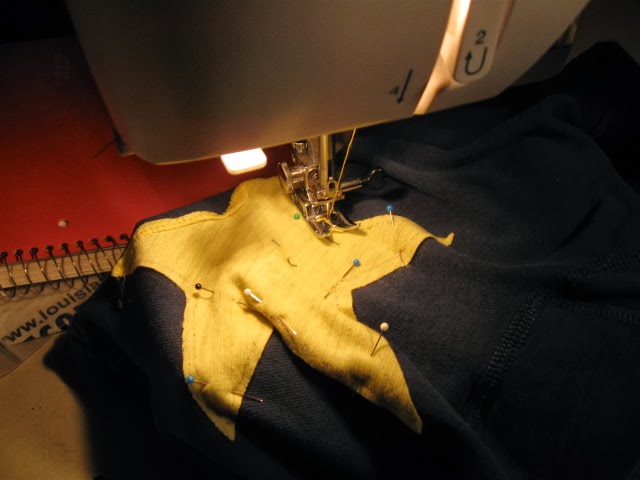
Almost there! All that is left is to sew the star in place (you may want to reinforce the seam with another strip of fabric around the perimeter to give it strength), and cut out the star just inside the seam, careful not to snip the fabric you want to stay.
..... and there you go. Taking factory made underwear and turning into a one of a kind custom work of art for your (or your sweety-pie's) backside.